
Do you want to try out Make (formerly known as Integromat) but don’t know where to begin? Don’t worry! Read this comprehensive guide for beginners to revamp your workflow with Make and increase your overall productivity and efficiency.
Begginers can expect a thorough, step-by-step introduction to the program from this comprehensive guide. This guide have you covered, starting with account creation and ending with testing your first automation workflow. This guide article also provides helpful hints and suggestions to help readers make the most of the tool.
You will be able to apply what you learn about using Make to automate your workflows to your projects and procedures by the time you reach the end of this guide.
Key Takeaways:
- Recognizing the positive effects of automating Make for Workflow on your business, such as increased output, decreased time waste, and fewer mistakes.
- Understanding how to sign up for Make and get around the interface.
- Learning the fundamentals of scenario creation, such as linking apps together and setting up triggers and actions.
What is Make (formerly Integromat)?
Make is the best workflow automation software based on cloud that facilitates the coding-free integration of various apps, services, and APIs. By developing a robust automation workflow with Make, users can save time and increase output. Its user-friendly drag-and-drop interface simplifies the automation of complex workflows integrating multiple apps and services.
Before using the program, you should become familiar with the following terms:
Scenario – A workflow that automates a process across multiple software and service platforms.
Module – It is a pre-built scenario that can be used as the foundation for constructing a more complex scenario.
App – The app is a third-party service or program that can be linked with Make to perform various automated actions.
Trigger – It’s the thing that kicks off the whole scenario. It’s the first thing that happens in a scenario. It could be anything from a new email to a new lead in a customer relationship management system to saving attachments to Dropbox.
Action – It directly impacts a scenario and is the task performed in response to a trigger.
Filter – A filter can be added to a scenario at any point in the workflow and based on various conditions.
Router – In most scenarios, the router splits data into distinct streams or conditionally routes data to various actions or modules.
Iterator – It lets users process and automate tasks involving multiple items or data sets in a way that saves time and reduces the amount of work they must do by hand.
Variable – It’s a convenient way to store, reference, and manipulate data as you work through a scenario.
What are the upsides of using Make?
Make has several applications in the realm of workflow automation. With Make, you can streamline your business processes, save time, and reduce manual labor by using this platform’s powerful automation capabilities and integrating multiple apps and services.
The following are the benefits of Make to your workflow:
- You can save time and effort with Make by automating routine tasks and streamlining processes.
- With Make, you can build a complex, individualized workflow with ease thanks to its drag-and-drop interface and modular design.
- Make provides a quick and easy way to set up and automate workflow thanks to its pre-built scenario. Make’s templates make it simple to automate processes and procedures without you having in-depth technical understanding or coding expertise.
- Make supports more than 500 integrations, allowing you to connect and automate processes across a wide range of services and platforms.
- Make’s built-in error handling features allow you to deal with errors and exceptions in your workflows, protecting your data and preventing processing mistakes.
- You can keep tabs on workflow activity in real-time with the help of Make’s real-time updates and notifications.
Let’s get started with Make
1 Go to Make’s website and navigate to the upper right corner and click the Sign in button if you already have an account or the Get Started for Free button if you are entirely a beginner and want to create an account.
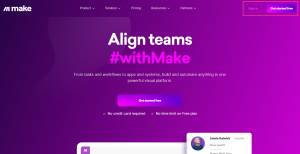
Note: If you sign up for a paid account, you can utilize Make’s advanced features.
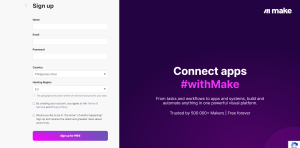
2. Your personal information is required to fill in, including your name, email address, password, country, and hosting region. You must also review the terms and conditions and mark it check before signing up. Once you click the Sign-Up button, Make will ask you to verify your email.
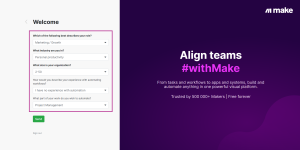
3. You will be redirected to the Make sign-in page after clicking the verified button on your email. You must then enter the email address and password you used to register. And you will also be required to answer questions regarding how you intend to utilize the platform
4. After answering a few questions and clicking the send button, you can start building your scenario. You can do so by clicking the + create a scenario button at the upper right corner of your Dashboard.
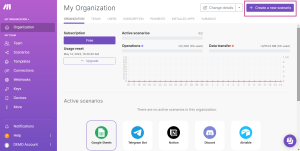
Note: Provide a pop-up Windows tutorial on navigating features and starting your first scenario.
Build your Scenario
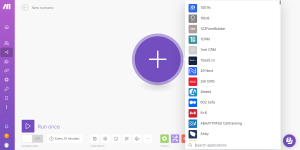
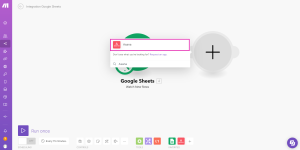
5. You will be taken to the scenario editor by clicking the button. Here, you can begin building your scenario and desired workflow. Start with a straightforward workflow, such as transferring data from Gmail to Google Sheets or creating tasks in Asana from Google Sheets. Initially, you may find it overwhelming, but once you have successfully executed a scenario, you will find it simple. First, choose an app or service by clicking the massive purple button on your screen.
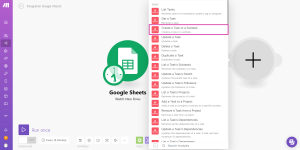
6. Choose a trigger app available on the list. You can use the search bar below to search for the app you will be choosing. Let’s say you want to create a task from Asana using your Google Sheets. You need first choose Google Sheets apps, a trigger app.
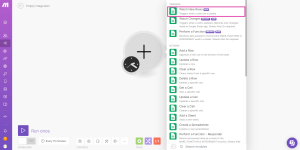
Once you click the Google Sheet, you will select Triggers or Actions. Click the “Watch New Rows” trigger.
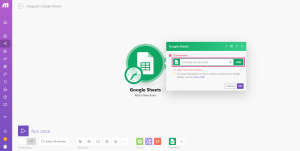
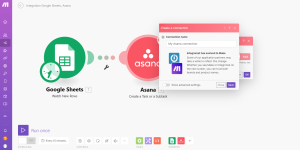
7. After selecting a trigger, connect your Google Sheets to Make. You’ll then be taken to a new window allowing Google Sheets to access Make and vice versa. If you follow the on-screen prompts, everything will work out.
Set trigger Criteria
8. Now that your account is connected to Make, you can now set trigger criteria. Here it would be best if you were specific about the trigger criteria.
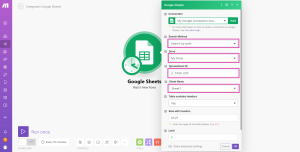
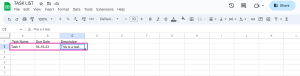
Of course, you must have a created file on your Google Sheets. There you can see the spreadsheet ID where I selected TASK LIST. TASK LIST is the name of the spreadsheet file I made where I will be creating tasks. While “Sheet1” is the sheet’s name inside the spreadsheet file. You can rename the sheet to be more organized.
9. Once done with the trigger criteria, you can start creating a new module. So, the second app will be Asana.
10. Once you click the Asana app, you must choose the action you want to perform. So, let’s start by creating a task or a subtask every time there are new task entries in Google Sheets.
11. Like what we did in Step 7, you must connect your Asana account to Make.
12. You will set the action criteria once you connect your Asana account to Make.
Here’s what you need to do:
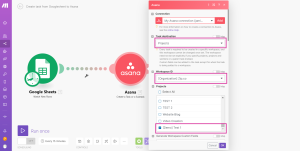
First, choose the specific workspace you want the task created on Google Sheets to reflect in your Asana account. It could be Project, Workspace, Project and Sections, Select Parent Task, or Map parent task.
Let’s say you wanted the new task to be viewed and reflected on your specific Project on your Asana; you need to mark the project below. I already created a project sample ([Demo] Test 1) on my Asana account, where I want the new tasks to be viewed once new tasks are made on Google Sheets.
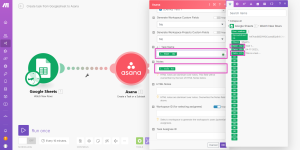
Then, under Task Name, pick the Name (A) code-like option on the code list. You might find it complex at first, but once you get used to it will be a breeze for you. If you want to add a description to the tasks, pick the info (C) code-like option under Notes.
Note: The A and C beside the code represent the cells on your Google Sheets.

Next is to add the due date to the task, so you need to choose the Date option under the Due.
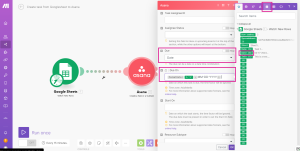
The first thing you need to do here is to click the calendar icon (date and time section) on the code panel and click the formatDate code under Function. Now click the star icon on the code panels. Between the open parenthesis and the semicolon, add the Date (B) code-like option, and between the semicolon and the close parenthesis, write MM-DD-YYY. It should look like this: formatDate(Date; MM-DD-YYYY).
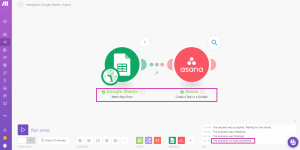
13. Run the workflow automation you build and check if it has an error.
How do we know if it works?
Once you create a task on your Google Sheet (Task List), all the tasks will be viewed on your specific project ([Demo] Test 1).
a. Add task to Google Sheets.
b. Go back to your scenario and click the Run button.
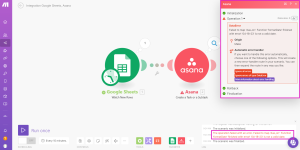
c. Error detected. Don’t panic when there’s an error; Make enables you to see what causes the error. You need to analyze the statements and fix the issues. It says’s “Failed to map ‘due_on’; Function’formatDate’ finish with error ’04-18-23’ is not a valid date.”
Now because 04-18-23 is the valid date, analyze what went wrong. Remember what you write on the date? The MM-DD-YYYY? The error there is the year that we put on the Google Sheets. Instead of 04-18-23, write it like this: 04-18-2023.
d. After you edit the due date on the Google Sheet, return to your scenario and re-run it.
You can see the green check, right? It means the scenario run successfully.
e. Check the project in Asana to see if the tasks are already there.
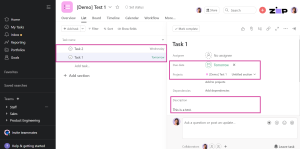
As you can see, the task can be viewed on the Asana project with the task name, due date, and description. Congratulations, you are now a certified Maker!
Wrap-up
You can create reality with Make by utilizing the drag-and-drop visual interface. We hope we guide and empower you to leverage Make to streamline workflows and automate your most time-consuming tasks with a guide article. Using Make as your tool will help you boost your productivity level. If you have questions on how to use Make, feel free to contact us.
Are you interested in upgrading your Make account to a higher tier? We can help you with your purchasing decisions. We can also offer you support and services such as technical support or onboarding you and your team!
 Platinum Partner Software and Services
![]() Asana – Effortlessly manage, monitor, and organize your team’s work in one unified platform built specifically for that purpose.
Asana – Effortlessly manage, monitor, and organize your team’s work in one unified platform built specifically for that purpose.
![]() Formstack – Forms, surveys, and other digital documents may be designed, managed, and optimized for usage in a wide range of corporate processes and applications on this flexible online platform.
Formstack – Forms, surveys, and other digital documents may be designed, managed, and optimized for usage in a wide range of corporate processes and applications on this flexible online platform.
![]() Make – Automation platform that enables the integration and automation of processes across several apps and services.
Make – Automation platform that enables the integration and automation of processes across several apps and services.
![]() TimeCamp -By keeping tabs on how much time is spent on various projects, tasks, and activities, time-tracking software can help you and your company become more efficient.
TimeCamp -By keeping tabs on how much time is spent on various projects, tasks, and activities, time-tracking software can help you and your company become more efficient.
![]() We provide an extensive assortment of software packages to ensure that you discover the ideal business solution.
We provide an extensive assortment of software packages to ensure that you discover the ideal business solution.
![]() Our specialists will evaluate your organization’s needs and offer the optimal software solutions based on your objectives, budget, and desired outcomes.
Our specialists will evaluate your organization’s needs and offer the optimal software solutions based on your objectives, budget, and desired outcomes.
![]() Whether you are a small business or a multinational corporation, we provide various volume licensing options to meet your organization’s specific needs.
Whether you are a small business or a multinational corporation, we provide various volume licensing options to meet your organization’s specific needs.
![]() With the assistance of our certified experts, your new software may be integrated into your current IT systems with minimal downtime.
With the assistance of our certified experts, your new software may be integrated into your current IT systems with minimal downtime.
![]() We provide comprehensive training plans and continuous support to make sure your team is prepared to make the most of your new software and keep it running smoothly.
We provide comprehensive training plans and continuous support to make sure your team is prepared to make the most of your new software and keep it running smoothly.
![]() To guarantee that your systems are always up-to-date and compliant, our team will manage software renewals and upgrades on your behalf.
To guarantee that your systems are always up-to-date and compliant, our team will manage software renewals and upgrades on your behalf.
![]() With the help of our specialists, you may safely and efficiently transfer your data to the new software.
With the help of our specialists, you may safely and efficiently transfer your data to the new software.